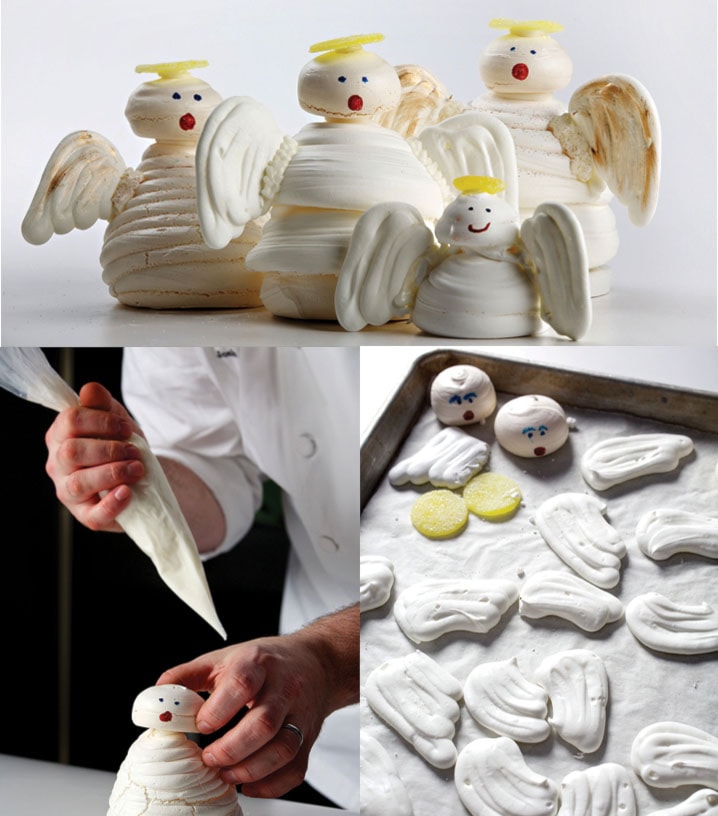
A bevy of angels makes a fun holiday centerpiece — and when the holidays are over, you can eat them. Even if you’ve never made meringue before, pastry chef Josh Short’s directions will make it easy. A word of caution: If you don’t achieve a firm mixture, it’s better to start over than to try adding extra lemon juice or sugar.
The bodies of the angels can be hollowed out and filled with ganache or sorbet (and eaten right away, of course). A sting of edible glitter on each angel makes a nice touch. For this recipe, it’s easiest to use disposable pastry bags.
Make ahead: The meringue pieces need to dry in the oven overnight before assembly.
Allow at least 30 minutes and up to 1 or 2 hours for the royal icing to set on the assembled angels. The angels can last for 3 to 4 weeks; they will get harder over time.
Ingredients
Makes three or four 3 1/2-inch-tall angels
6 large egg whites or 1 cup pasteurized egg whites
1 tablespoon freshly squeezed lemon juice
1 cup granulated sugar, plus 1 tablespoon for halo assembly
1 1/2 cups confectioners’ sugar
1/2 cup cornstarch
Royal icing (see NOTE)
Red paste food coloring
Blue paste food coloring
3 yellow gumdrops, or other yellow gum candy
Steps
Beat the egg whites and lemon juice in the bowl of a stand mixer on medium speed until the whites form soft peaks. Begin adding the cup of granulated sugar very gradually, sprinkling in no more than a tablespoon at a time, evenly, to form fairly firm peaks. Do not rush this process.
Reduce the mixer speed to low; alternately add tablespoons of the confectioners’ sugar and the cornstarch, increasing the mixer speed as needed so each addition is well incorporated. This will take several minutes and should produce a smooth, glossy meringue that is quite firm and holds a shape well.
Line 2 baking sheets with parchment paper. Preheat the oven to 250 degrees.
Scoop the meringue into a pastry bag that has about a 1/4-inch opening (no tip is needed); alternatively, use a large resealable plastic food storage bag with one of the bottom corners snipped off. Don’t fill the bag more than half full.
To make the angels’ wings, place the template under the parchment paper. Pipe out the meringue to trace and fill in the outline. Make extra wings, in case of breakage. Feel free to vary the size (freehand, if you feel comfortable doing so).
To make the angels’ heads, hold the pastry bag perpendicular to the baking sheet and pipe out 3 balls as round as possible (they will flatten on the bottom), spacing them at least an inch apart.
Cut a slightly larger opening (1/2 inch to 3/4 inch) at the end of the same pastry bag (or if you’re not using a disposable bag, use a bag fitted with a tip that allows for the same size opening). For the angels’ bodies, hold the pastry bag just above the sheet; squeeze slowly until the base is as large as you need it to be, then start raising the bag slowly to create a rounded cone-shaped body. The base might be 2 1/2 to 3 inches wide, with the bodies about 31/2 inches tall.
Bake for 1 1/2 to 2 hours, until the meringues are cream-colored and crisp on top when tapped. They may develop cracks; that is okay. Turn off the oven; let the meringues cool and dry out overnight on the baking sheets.
To assemble, if you’re working alone, it’s best to build one angel at a time. Use (a firm) royal icing to attach the wings to the body. If necessary, use gumdrops to help hold the wing in place.
Dab a drop or two of the red and the blue paste food coloring on a plate. Use a clean, thin brush or the blunt end of a toothpick to paint mouths and eyes on the heads.
Spread the remaining tablespoon of granulated sugar on a small plate. Cut a horizontal slice from the bottom of a gumdrop, dip it into the sugar and use a rolling pin to roll it out into a larger, thin circle. Dip it in the sugar again and cut out a round circle for the halo.
Pipe a large bead of royal icing on top of the body to attach the head. Then gently pipe a small bead on the head to attach the halo. Repeat assembly for the remaining 2 angels.
Note: To make royal icing, whisk 1 tablespoon plus 1 teaspoon of pasteurized egg whites (from 1 large egg) in a medium bowl together with 1/4 teaspoon each of vanilla and almond extracts and 1 cup of confectioners’ sugar. Add water in very small increments to create a thick, sticky glue. (Royal icing recipe from chef Carla Hall; Josh Short likes to use lemon juice instead of the extracts.)
Nutrition: Ingredients are too varied for a meaningful analysis.
What you’ll need
Short, pastry chef at the Hay-Adams Hotel in Washington, has created this year’s cookie project: Meringue Angels. With the right consistency of meringue, he says you can quickly become adept at making angels of varying size and shape. Use them as a garnish for your holiday buffet — or just eat them.
Besides the recipe ingredients, you’ll need:
• Stand mixer, fitted with a whisk attachment
• One or two disposable pastry bags (or you can use a large resealable plastic food storage bag and cut off one bottom corner)
• Wing template
• Parchment paper
• Rolling pin (for the halos)
• Yellow gumdrops or Dots or fondant (for the halos)
• 1-inch round cutters (for the halos)
• Red and blue paste food coloring (for the face; such as Wilton brand)
• Edible glitter (optional, but recommended)