With Ukrainian Christmas falling today, it seemed appropriate to start my first article of the New Year with perogies.
Perogies’ humble roots originated in Poland but in my mind these potato filled dumplings are synonymous with the Ukrainian kitchen.
Like many people living on the Prairies, it is hard not to know someone with Ukrainian heritage — cousins’ husbands, friends and co-workers. I am lucky that my Ukrainian influences are from all three categories. Maybe because our passion for food, whenever I am with them, it is quite common for our conversations to turn to perogies.
When this happens, no matter who I am talking to, they tend to get this faraway look as they relate their perogy-making experience. It’s never just relating the recipe or sharing the technique of how the dumplings were made, but more of reminiscing back to the comforts of warm, inviting kitchens filled with laughter, conversations and bantering amongst aunts, uncles, cousins and neighbours.
I have come to recognize that these dough-filled dumplings are not just filled with potatoes, they are also plump full of memories of family love and togetherness.
Perogies are a steadfast favourite in Ukrainian family gatherings, church socials and community potlucks and when they are made, there is a mass production with tables and kitchen counter tops being filled with rows and rows of the perogies. They have a tendency to bring “all hands on deck” or, maybe in this case, “all hands in the kitchen.” An assembly line is formed, with each person having a specific task — rolling, stuffing or crimping. As the dumplings were formed, so were life moments and memories.
The charm of perogy making is a bit more personal for me because they remind me of making samosas with my mom, siblings and extended family.
Like the perogy assembly, making samosas was always a family project; if you were home, you helped. The task was divided with one person rolling the dough, another shaping while another would be frying the samosas — all peppered with idle chitchat, of course.
Those were memorable times because not only did we share our lives with each other but my parents would relate their childhood stories. Unfortunately, because samosas can now be easily purchased, we don’t make them as readily as we did back then.
Having received a perogy recipe from a Ukrainian friend during the holidays, I decided to turn perogy making into a family activity. It was not only a relaxing time with my kids, but I learned how easy and delicious homemade perogies were.
Preparing homemade perogies can be broken down into three simple steps: making the filling and the dough, forming the perogy shape and then finally cooking.
Making the filling and dough
Cook the potatoes for the perogies like you would for mashed potatoes — boil peeled potatoes with onion for flavouring until soft. After fork tender, mash the potatoes and add cheese. Save the water from the potatoes to make the dough. The dough can easily be made in the food processor or mixer and is a combination of flour, salt, oil and water.
In Melissa’s great-grandmother recipe, flavour is enhanced by adding the reserved water from the potatoes.
Forming perogies
Roll the perogy dough on a floured board or countertop until one-eighth-inch thick. Cut circles of dough (two inches for small perogy and three to three and a half inches for large perogy) with a cookie cutter or drinking glass.
Place a small ball of filling (about a tablespoon) on each dough round and fold the dough over, forming a semi-circle. Press the edges together with the tines of a fork. If you are having a hard time getting the edges to stick together, you may have too much flour in the dough.
Add a little water to help get a good seal, or assign someone to crimp the edges with a fork — a job well suited for the little helpers in the assembly line. Perogies have a tendency to stick together so keep them separate both before and after you have boiled them. A touch of oil or melted butter on the pan helps keep them from sticking as well.
Lay out on a baking sheet in one layer and freeze until solid. Once frozen solid, transfer to zip top freezer bags and put back in the freezer.
Cooking perogies
To cook, bring water to a boil in a large pot (they need lots of room so that they do not stick together). Add one to two tablespoons of oil to water. Add perogies a couple at a time so they do not stick together. Stir gently.
Once the perogies float, approximately five to eight minutes, they are done, drain the water.
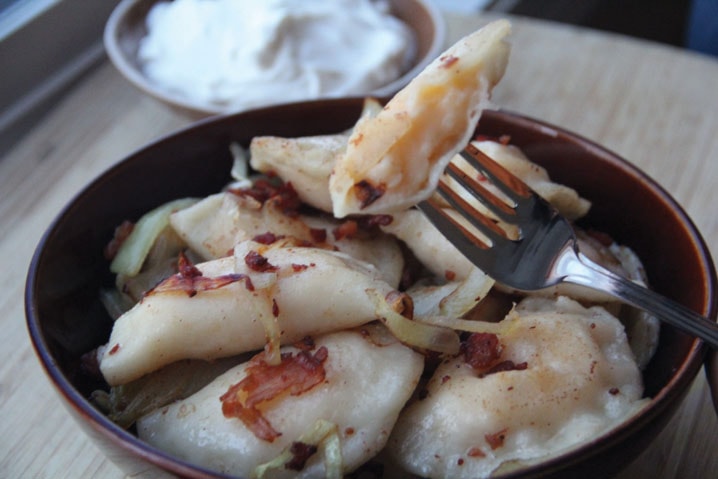
They can be eaten with butter with a dollop of sour cream on the side but perogies pan fried with bacon and caramelized onion is the perfect pairing!
The method I described to make perogies is the traditional method that has been used in many Baba’s kitchens in the past.
These days, you can easily find perogy makers that will get the job done faster.
But remember, making perogies isn’t about getting the job done but creating memories.
Madhu Badoni is a Red Deer-based freelance food writer. She can be reached at madhubadoni@gmail.com or on Twitter @madhubadoni.