“Trying to fit a round peg into a square hole” is the phrase that always comes to mind whenever I am making s’mores.
I don’t need a campfire to make this ooey, gooey, yumminess. I simply pop a marshmallow on a graham cracker and nuke it for a few seconds. Each time I watch the round marshmallow swell, puff up and then topple over into a sticky mess. And each time my family listens to me ramble on about a round marshmallow on a square cracker. Why aren’t there any square marshmallows?
To realign the s’mores in my world, I went on the hunt for a square marshmallow. Though my search was fruitless, I did learn that this sweet confection has very deep roots.
They are called “marshmallows” because part of the early recipe called for sap from the root of the marshmallow plant. The stem was peeled back to reveal the soft and spongy pith. Until the mid 1800’s, a cousin of the marshmallow candy was made using this sappy pith. French candy makers whipped the plant extract into egg whites and sugar to make not treats, but medicine. Since the sap was known to have antibacterial properties, the marshmallows originally were used to treat sore throats, suppress coughs and help heal minor cuts and burns.
Popularity of the marshmallow soared and a quicker production method had to be found. Unfortunately for me, this is how round marshmallow came to be.
Because of ease, the process which was first developed and still utilized today involved running ingredients through tubes and then extruding the finished product as a soft cylinder. The tubes were then cut into sections and rolled in a mixture of finely powdered cornstarch and confectioner’s sugar.
Since extracting the sap from the root was also labor intensive, this resulted in the modern recipe of corn syrup, corn starch, sugar, and gelatin. By the way, the modern marshmallow no longer has any medicinal benefits like its birth cousin.
I came to the realization that the only way I was going to have a square marshmallow for my square cracker was to make them myself. No problem! Pillowy soft marshmallow can be whipped up in three easy steps!
Marshmallow making begins with gelatin as this is what gives the marshmallow its thick dense spongy texture. In order for the gelatin to do its job properly, it needs to bloom or soften in cold water. While this is happening, one can move on to step two: making candy syrup.
The syrup involves cooking sugar, corn syrup, water, and salt until it reaches the soft ball stage. To remove the guesswork it is best to use a candy thermometer. Syrup is ready once the temperature reaches 240 F or 115 C. Once this is done the two mixtures (gelatin and sugar syrup) are combined and whipped until thick and fluffy.
If you have a stand mixer, you can just leave it and let the mixer do all the work. However, it is amazing to watch how in ten minutes opaque coloured syrup gradually transforms itself into a thick white fluff that looks like a meringue. Unlike a meringue, the marshmallow is very sticky so you will need a damp offset spatula or rubber spatula to spread it into the pan. For lighter marshmallows, some recipes also incorporate whipped egg whites into the fluff.
The pan has to be lined with parchment paper and dusted with icing sugar (or pan can be greased and liberally dusted with icing sugar) to ensure easy removal. The marshmallow does need about eight to ten hours to set. It is best to use either clean kitchen scissors or a pizza cutter to cut the marshmallow.
The freshly cut squares also need to be dusted with confectioners’ sugar so that all the sides are no longer sticky.
Once you are comfortable with the basic recipe, you can experiment with creating different variety of marshmallows. You can substitute almond or mint extract or even lemon or orange zest for the vanilla extract.
Another idea is to add a little food coloring. Red for Christmas, green for St. Patrick’s Day, and orange for Halloween makes for season appropriate marshmallows. And if you want to coat them in something besides’ sugar, try using toasted coconut, melted chocolate, or even toasted and ground nuts.
Of course, you can cut the marshmallow into other shapes besides squares, simply by using your favorite cookie cutters.
Home Made Marshmallows
2 1/2 tablespoons unflavored gelatin
1 1/2 cups granulated sugar
1 cup light corn syrup
1/4 teaspoon salt
2 tablespoons pure vanilla extract
2 egg whites, whipped to meringue (optional)
Confectioners’ sugar, for dusting
Combine gelatin and 1/2 cup cold water in the bowl of an electric mixer with whisk attachment. Let stand 30 minutes..Combine granulated sugar, corn syrup, salt, and 1/2 cup water in a small heavy saucepan; place over low heat, and stir until sugar has dissolved. Wash down sides of pan with a wet pastry brush to dissolve sugar crystals.
Clip on a candy thermometer; raise heat to high. Cook syrup without stirring until it reaches 240 degrees . Immediately remove pan from heat..With mixer on low speed, slowly and carefully pour syrup into the softened gelatin. Increase speed to high; beat until mixture is very thick and white and has almost tripled in volume, about 15 minutes. Add vanilla; beat to incorporate. If using, mix in whipped meringue. Generously dust an 8-by-12-inch glass baking pan with confectioners sugar. Pour marshmallow mixture into pan. Wet your hands, and pat it to smooth. Dust top with icing sugar; let stand overnight, uncovered, to dry out. Turn out onto a board; cut into 1 1/2-inch squares, and dust with more sugar
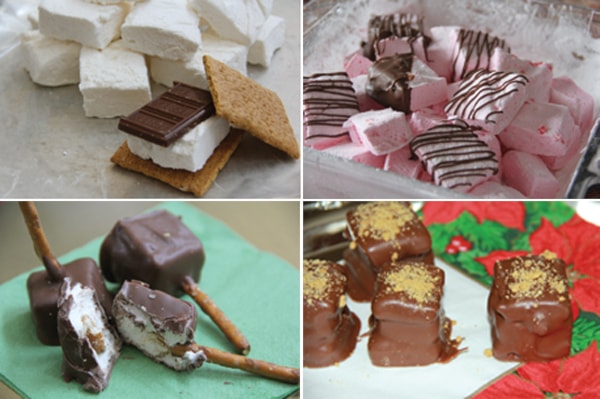
Marshmallow Pops
pretzel sticks
melted chocolate
marshamallow
Pokethe pretzel stick into cubed marshmallow. Dip in chocolate and let set on parchment paper.
S’mores Bites
(Makes 30-40 S’mores Bites)
8-10 rectangular graham crackers
1 lb chocolate candy coating
1/4 cup powdered sugar
1/4 cup corn starch
Take each graham cracker and cut into four smaller squares. Cut the marshmallow into squares that are the same size as the graham cracker squares. Melt the candy coating in a medium bowl in the microwave until it’s melted and entirely smooth. Smear a dab of melted coating onto the top and bottom of a marshmallow and press it between two graham crackers to make a sandwich, using the coating to secure it to the crackers.
Once all of the marshmallows are sandwiches, refrigerate them briefly to set the candy coating. To dip, cover a baking sheet with waxed paper. Take a marshmallow-graham sandwich and press it down into the melted coating. Use a fork or a spoon to cover the top and the sides with chocolate, paying special attention to the sides and the spaces between the marshmallow and crackers where gaps are likely to develop. Remove the S’mores Bite from the coating with a fork, and tap the edge against the lip of a bowl several times so excess coating drips off. Set the candy on the prepared baking sheet, and repeat with the remaining marshmallow sandwiches. If you desire, you can decorate the tops with crumbled graham cracker. Refrigerate the tray to set the candy coating.
Madhu Badoni is a Red Deer-based freelance food writer. She can be reached at madhubadoni@gmail.com. Watch for Madhu’s Masala-Mix blog on www.reddeeradvocate.com