They are a must at my house for Sunday dinners. They are a staple during the holiday spread and the perfect accompaniment for the wintery soups and stews. They arrive in that irresistible basket of hot, buttery dinner rolls.
Nothing beats the aroma of fresh baked buns wafting from the oven, and nothing pleases my family more than biting into a warm, light-as-air slathered with butter dinner roll.
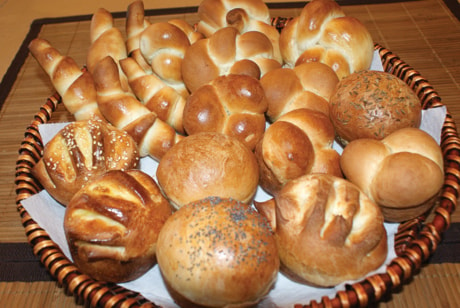
Making buns at home is easy, enjoyable and inexpensive. I love dinner rolls recipe because it is one recipe that can yield so many different varieties of buns. There is probably no bread product that allows you to be more creative than the dinner rolls. You can make them plain or fancy with a multitude of shapes and toppings.
My approach to making buns at home is the same way as doing laundry. Sure, from start-to-finish it may take a while, but you spend very little time with the bread (or laundry) itself.
Though mixing and the kneading can be done by hand, I let my electric mixer do all the work. I add all the ingredients except the flour into bowl attach the dough hook and mix the ingredients together. Then gradually one cup at a time I pour in flour until the dough ball is formed.
Whether you choose to work your dough by hand or use mixer, you still need to work the dough for at least 10 minutes to allow the glutens to develop. Glutens are strands of protein which, when developed, become very elastic. This elastic gluten is what allows bread dough to stretch as it rises.
Once the dough has been well kneaded let it rise in a greased bowl. Cover the dough with a dampened dish cloth over the bowl for rising. Using a damp cloth keeps the dough from sticking to the fabric. Let the dough rise in a warm place for an hour.
Next comes the fun part when you can form the dough into whatever shape you want. If you want round rolls, cut the dough into smaller portions and form them into tight balls.
If you want an alternative to regular round rolls, try making knot, rosette, fan or crescent shaped rolls.
• Cloverleaf rolls — Take enough dough for one roll. Divide into three balls and place in muffin tin.
• Knot Shaped Rolls — To create knotted rolls, first divide the bread dough into several equal sized balls that are a little less than one cm in diameter. Roll the dough back and forth between your hands and the work surface to form a rope about 30 cm in length the width of your finger. Gently tie the rope of dough into a loose knot.
• Rosettes dinner buns — Creating a rosette involves one extra step from tying a knot in the dough. Just tuck the ends under the knot.
• Fan Rolls — Simply take your rounded dough and cut six slits using sharp scissors.
• Crescent Shaped — Take enough dough required for 8 buns. Roll dough out into a 30-cm circle, as you would for pizza. Spread with melted butter. Cut into eight wedges. Roll up, beginning at rounded edge. Place rolls, with seam underneath and ends pointing inward to make crescent shape.
Whatever shape you have chosen for your buns, place them in a greased pan and let rise again.
When the rolls are nearly ready to go into the oven, it’s time to add some finishing touches. For an attractive glaze, you can brush them with a simple egg wash. The wash will also anchor any topping you want to add.
Poppy seeds and sesame seeds probably spring to mind first but consider cumin, fennel and caraway seeds. A topping of grated cheese will melt and brown to a deliciously rich, crunchy crust. Parmesan, sharp cheddar and mozzarella are especially good.
If you wish to add herbs, garlic, citrus zest, or dried fruits to your dinner rolls, they should be mixed or kneaded into the dough; otherwise, they will burn in the oven if you put them on top of the rolls.
As some of you are reading this, you are thinking: “I am definitely going to try this during the weekend.” But making buns doesn’t have to be a weekend undertaking. With preparations the night before, fresh buns can easily grace your table during the rushed weekday dinners.
To bake the buns the next day, wrap pan in plastic wrap and refrigerate the shaped rolls overnight. At least half an hour before baking, remove from the refrigerator and allow to rise. Bake as directed.
To freeze the dough, put the covered pan in the freezer until the rolls are frozen. Store frozen rolls in a heavy-duty re-sealable plastic bag. To defrost, place them on a tray dusted with flour and cover them with lightly greased plastic wrap. Thaw overnight in the fridge, leave at room temperature for 30 to 60 minutes before baking.
There is no secret or grandmotherly magic to create a buttery bun at home. “You just knead the dough”. So whether you are expecting company or feeding the family, bake a little goodness into your next meal. Bring on the dinner roll!
Dinner rolls (24 small buns)
(For whole wheat buns, you can substitute half whole wheat flour and half all-purpose flour)
3/4 cup milk, lukewarm ( can do this in microwave)
3/4 cup water, lukewarm
1/2 cup white sugar
1 teaspoon salt
2 eggs
5 teaspoons Quick-Rise yeast
5 cups all-purpose flour
1/2 cup margarine, melted
Place all ingredients expect flour into a bowl. Mix. Gradually add flour until ball is formed. You can knead by hand or use a mixer. Shape the dough into rolls, and place on a baking sheet. Let rise again for 20 to 30 minutes. Bake rolls in a preheated 400 degrees F (205 degrees C) oven for 15 minutes, or until done.
Madhu Badoni is a Red Deer-based freelance food writer. She can be reached at madhubadoni@gmail.com. Watch for Madhu’s Masala-Mix blog on www.reddeeradvocate.com.